September 2008 Cub Scout Roundtable Issue |
Volume
15, Issue
2
October 2008 Theme |
Theme:
Adventures in Books
Webelos:
Citizen and Showman
Tiger Cub
Achievement 5 |
PACK AND DEN ACTIVITIES
Dont miss the great article on getting your Cubs to read in the September
2008 issue of Scouting Magazine, "Guys Read Guy Books." The author really
understands us reluctant readers. CD
Den Trips
Heart of America Council
P
Visit a museum.
P
Visit a library. Before going with
your den, talk with the librarian and arrange to have him/her speak with your
Cubs about the library and books.
P
Visit a retirement center and chat with
someone who has seen a lot of history happen that your Cubs (or you) may have
read about in books. (You do not need a retirement center - there are
plenty of Great Grandparents out there still living on their own!!! My Mom is
82 and still going strong!! CD)
Den Ideas
(Activities, field trips - JUST IDEAS!)
Capital Area
Council
There are many ways to have a great month of den meetings
with this theme - Again the only limitation is your imagination. Here is a list
of possibilities that you can expand on:
Field Trips:
P
Public library
P
School library
P
Book stores
P
Book binder/publisher/printer
Activities:
P
Sponsor a Read-a-Thon for the month
P
Do Dinner and a Book
P
Collect gently used books to be donated to a homeless shelter, or
childrens hospital
P
Have a storytelling contest
P
Make a den story book
P
Make individual story books (these can be fiction, nonfiction,
written, picture books,
P
read and recorded)
P
Record stories (books on tape) for younger children.
P
Collect stories to have available for babysitting experiences.
P
Do you have a local author who could be invited to talk with the
boys at either den or pack meeting? Or with whom you could visit at his/her
home or other place to write? Have a list of questions to ask to get
conversation started between boys and author.
P
Try having a costume party where everyone comes as a character
from a favorite book. Then have everyone else try to guess the name of the
character or the book. This might be a fun pack meeting idea.
What If?
Sam Houston
Area Council
The following are story ideas you can use during a quiet
time in your den meeting. Let each Scout pick one these ideas (you can add a few
of your own), give him a few minutes and let him finish the story. Imaginations
can be very powerful and lots of fun, too.
«
What if a plane landed in the school yard one day?
«
What if you saw a zebra grazing in front of your house one
morning?
«
What if you found a turtle in your bathtub?
«
What if you were traveling in a wagon hundreds of years ago?
«
What if your pet could talk?
«
What if someone gave you three wishes: what would you wish for?
«
What if you were principal for a day: what would you do?
«
What if you were invisible?
«
What if aliens took you for a ride in their spaceship?
«
What if you could fly?
Magic Book
Sam Houston
Area Council
Create a
little 8-page book from one piece of paper,
without staples or other bindery!
An 18x 24 sheet of paper will make a 9x6 book. The boys
can make mini books from typing paper (8 1/2" by 11") as well. They can write
about themselves or draw pictures.
1.
Label the sheet of paper as shown. You can use these labels,
or create your own. Or leave the apges blank for the boys to decide.
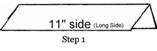
2.
Fold a rectangle sheet of paper into half, lengthwise. Crease
well. Open
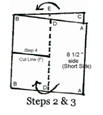
3.
Fold the paper into half the other way.
Line B-B is in the middle of the 11" side
4.
Bring each end to the center fold.
Edge A-A goes to B-B, folding out along D-D
Edge C-C goes to B-B folding out along E-E
5.
Leave the fold along B-B and
Unfold the folds made in Step 3
Then in the middle of the B-B fold,
cut from the center fold to the middle fold.
Along Cut Line (F) in above picture
From line B-B to lines D-D and E-E
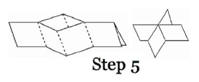
6.
The open the sheet of paper and
Refold on the original crease (See Step 1), then
Push ends toward the middle (Step 5, left picture)
Until you have four "pages." (Step 5, right picture)

7.
Fold it like a book.
Fold a Book and Tell a Story:
Alice, Golden Empire Council
Here's another version of
the instructions from Alice
In 1548, Francois I decreed
standard paper sizes for France and arrested anyone who disobeyed. To cut waste
and use every bit of paper surface, printers came up with imposition a
complicated, topsy-turvy way to print pages that could then be folded so that
all the pages ended up with print facing in the right direction.
You can make your own folded book!
Materials:
18 x 24
sheet of paper
(8 1/2 by 11 works, too!)
Scissors or X-acto knife
A favorite story or your
imagination
Directions:
«
Fold the paper in half cross-wise ,
«
Then in half cross-wise again.
«
Unfold, and fold in half lengthwise.
«
Now unfold completely and cut a slit in the paper as shown below:
«
Fold the paper in half length-wise; holding it at both ends, push
your hands together to form pages
«
Now fold in half to complete your booklet.
«
Add a picture and/or text to each page and youll have a low tech
book!
This could
also be used to catalogue a collection, using each page for a different
item. Alice
Make Your Own Paper!!
Sam Houston
Area Council
This will
take longer than one den meeting and
you will need some parental help, but it is a fun activity!!
Instructions:
Scraps of paper
Blender
Water
Mold (see #1 for several ways to
make a mold
Newspaper
Kitchen towels
Rolling pin
Hair dryer and/or iron (for
drying)
Instructions:
1.
First you need to make a mold. The mold will determine the
size of your piece of paper. It can be made simply by stretching fiberglass
screen (plain old door and window screen) over a wooden frame and stapling it.
Or it can be made by stretching fabric over a wooden frame (an old one with
glass removed) and stapled into place.
Other mold possibilities:
ü
Wire Clothes Hanger - Bend the wire hanger to make any
shaped frame of your choice. Cover your hanger with a nylon stocking and staple
into place.
ü
Embroidery Hoop - Place screening or nylon stocking between
two hoops to make an inexpensive mold
2.
Protect your working surface (for after the pulp is in the
mold) with newspaper.
3.
Select the pieces of paper to use. You can even mix types to
create your own unique paper.
Computer Paper (unprinted)
Newspaper (
Magazines
Egg Cartons
Old Cards (For making heavier
paper)
Toilet Paper
Paper Bags
Office Paper
Tissue Paper (For making finer
paper)
Typing Paper
Napkins
Construction Paper
4.
Rip the paper into small bits, and place into the blender
(about half full).
5.
Fill the blender with warm water.
6.
Run the blender slowly at first then increase the speed until
the pulp looks smooth and well blended. (30 -40 seconds) Check that no flakes of
paper remain. If there are, blend longer.
7.
Fill a container (big enough to hold the mold) about half way
with water.
8.
Add 3 blender loads of pulp (the more pulp you add the thicker
the finished paper will be).
9.
Stir the mixture.
10.
Place the mold into the pulp and then level it out while it is
under the water.
11.
Gently wiggle it side-to-side until the pulp on top of the
screen looks even.
12.
Lift the mold out of the water.
13.
Hold the mold above the container until the mold stops
dripping.
14.
Turn the mold upside down on to a clean kitchen towel, fabric
or felt. This should tip the pulp out of the frame. If the pulp sticks, it may
need a little easing.
15.
Place another kitchen towel, piece of fabric or felt over the
back of it.
16.
With a rolling pin, firmly and evenly press down on the top
kitchen towel. This will remove even more water.
17.
Carefully peel back the kitchen cloth, fabric or felt and
there is your paper.
18.
You can hang the paper to dry or use a hair dryer or iron to
complete the drying.
19.
When youre finished making paper, collect the leftover pulp
in a strainer and throw it out, or freeze it in a plastic bag for future use.
Dont pour the pulp down the drain.
You may
need to practice as you learn to get the right amounts of pulp onto the mold and
how to spread the pulp evenly on the frame.
Hide Your Message in a Circle:
Alice, Golden Empire Council
The ancient Greeks wrote in almost
any direction even in a circle- before they settled on left to right. The
tricky part is, the writing begins on the outside going into the center this
is called Spiral writing. But if you write your message in a spiral, it might
even hide for a while, almost like a secret code!
Secret Book Safe
Sam Houston
Area Council
Make a secret
place to hide your stuff. You can put money, secret messages, keys, or treasures
in the secret compartment. When you close the book and put it on your bookshelf,
no one will know its a safe except you!
Materials:
An old hardcover book
Ruler
Pencil,
Hobby knife or scissors
White glue.
Instructions:
1.
Find a hardcover book that no one wants. It should have at
least 200 pages.
2.
Open the book to the first page.
3.
Take a ruler and pencil and mark 1 inch from all four sides of
the page. Connect the lines to make a rectangle.
4.
Using scissors or a hobby knife and ruler (with adult
supervision and assistance)
5.
Cut out the shape you just drew, leaving the 1 inch border.
6.
Repeat steps 2 and 3 with the remaining until the middle
sections have been cut out. Be patient this may take awhile. Try to cut a few
pages at a time. When youre done you should have a rectangle-shaped empty space
inside the book.
7.
Brush white glue along the four walls that line the empty
space. You may want to do the same with the outer edges of the page to make them
solid.
8.
Allow the glue to dry. Several coats of glue may be applied
one at a time with drying time in between applications.
Make Personal Bookplates
Alice, Golden Empire Council
Let each boy design and make his own bookplates. Make sure
the boys understand what bookplates are and how they are used. They are to
identify a persons books by putting a personal label with their name on the
inside cover of each book. If you dont have a sample, go to:
www.myhomelibrary.org/bookplates.html
The design could represent some of the boys favorite
things, special talents or interests, or even a picture of him reading in his
favorite place, such as a tree. Bookplates could be designed using hand
drawings, stamp pad art, images and letters cut from magazines, or any
combination. Once a bookplate has been designed, it could be reproduced on the
computer and printed out on adhesive address labels.
Make Your Own Oobleck
Sam Houston
Area Council
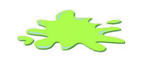
In the book, Bartholomew and the Oobleck by Dr. Seuss,
the king of Didd wishes for something different to fall from the sky than rain
or snow. Though no one is prepared for a sudden shower of Oobleck! Now you can
make your own magical messy Oobleck at home.
Materials:
2 cups of cornstarch
1 cup of water
Green food coloring
Sheet of wax paper
Instructions:
1.
Mix together the cornstarch, water, and food coloring in a
bowl.
2.
Pour a little onto the wax paper so you can play with it.
3.
Roll it between your hands and it feels solid, but let it sit
and it becomes a gooey liquid.
What is it,
solid or liquid?
How would it feel if this stuff fell from the sky?
Design A Book Jacket
Sam Houston
Area Council
The man who
said, Don't judge a book by its cover,
never sold a book.
Materials:
·
Paper large enough to be a book jacket (could be 11x17 or legal
size paper),
·
Paper (construction paper, drawing paper, etc) to decorate the
jacket,
·
Scissors,
·
Paint, Crayons, Markers, etc
·
A few book jackets to look at as examples.
Instructions:
Begin by having a discussion
on the characteristics of book jackets. Ask the Scouts to think about things
that designers may have to be considered when designing a book jacket for a
book. What information needs to be included (author, genre, plot summary, title,
etc...).
Have the boys design a book
jacket for their favorite book or for a book theyd like to read or for a book
theyd like to write someday.
Life-Sized Characters
Sam Houston
Area Council
Materials:
Butcher paper,
Scissors,
Writing utensils,
Paint,
Yarn for hair,
Glue
Instructions:
Ask students to choose their
favorite character from a book and think of how that character looks. What are
they wearing? Do they have any distinctive characteristics? Do we know what
color hair or what color eyes they have? What do their shoes look like?
Roll out a long length of
butcher paper and ask students to draw their character life size.
Have the boys lay down on the
butcher paper as someone else traces their body to be the basic outline of their
character.
Use paints to fill in the
outline of the character.
When the paint is dry, cut the
characters out and display.
Fun addition -
Ask students to pick out their favorite quote that their character says in the
book, write it out on a piece of paper, and attach the quote as a cartoon
bubble along with the picture.
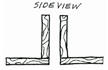
Make Your Own Bookends
Sam Houston
Area Council
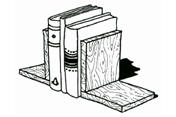
For this simple wood project you will need: a hammer, a
ruler, a pencil, wood glue, four pieces of soft wood (like pine or fir)
approximately 4 x 5 in size, two pieces of felt or non-skid material,
sandpaper: coarse, medium and fine, 6 finishing nails, at least 1 ½ inches long
Instructions: The wood size measurements are guidelines.
Cut your wood to the desired size.

1. Sand the wood until it is smooth to the touch. First,
sand all sides and edges with the coarse sandpaper, then sand it with medium
sandpaper and then fine sandpaper.
2. When the wood is smooth, draw a line across the wood, ½
inch from one of the shortest sides and mark three evenly spaced places along
it. Hammer one nail into each of those marks so that they pop out on the other
side.
3. Put glue along the edge of the other piece of wood. Hold
the glued piece upright and place the other edge, with the nails sticking out,
up against the bottom edge making a right angle. Tap the nails all the way in,
connecting the two pieces of wood. Allow it to dry.
You may decorate your bookends with paint but the natural
grain wood may be beautiful as it is.
To bring out the beauty of the wood grain and finish the
wood so it will resist dirt, rub the bookends with furniture oil or paste wax.
Buff them until they shine.
The Braille Cell
Sam Houston
Area Council
Most people read by using their eyes. However, people who
cant see can still read. They read with their fingertips!
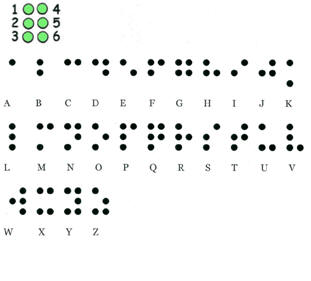
«
The Braille alphabet is based on a rectangle of six dots.
«
Each dot position has a number, 1 through 6.
«
For each letter, some dots are raised and some are not.
«
For example, an A has one raised dot in position 1.
«
The G has four raised dots in positions: 1, 2, 4, and 5.
«
Use the Braille alphabet to write messages or your name.
Make A Braille Card
Sam Houston
Area Council
Materials:
Card stock or poster board cut to
about 4x8 inches,
white glue,
toothpicks,
split peas,
Braille alphabet,
ruler,
pencil.
Instructions:
ü
Using your ruler and pencil, divide your card into as many
sections as you need for the letters in your name. Each section will be used for
one Braille letter of the alphabet.
ü
Using the Braille alphabet as your guide, place split peas in each
block to spell your name.
ü
When you are sure the peas are positioned correctly, take a small
amount of white glue on a toothpick and apply to each pea.
ü
Place the pea back on the card.
ü
Allow to dry.
Whose Name Is This?
A Braille Game
Sam Houston
Area Council
ü
Using the Braille name cards from the previous activity, mix them
up and pass them to the members of your group.
ü
Allow each person to decode the Braille card and discover the name
on the card.
ü
Play several times to allow everyone to be familiar with decoding
Braille.
ü
Use the Braille Alphabet as your guide until you are familiar with
the feel of each letter.
Tricky Book Bat
Sam Houston
Area Council
Materials:
A piece of thick strong
cardboard,
A piece of thin black cardboard,
2 rubber bands, and
A key ring,
Paper,
Glue
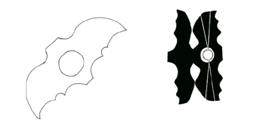
1.
Cut out a bat shape from thick strong cardboard. (The
cardboard needs to be strong enough to hold a stretched rubber band in
position.)
2.
Make a hole in the center of the bat shape, about half again
as big as the key ring. (e.g., if key ring is 1" in diameter, hole should be
about 1 1/2" in diameter.)
3.
Use the bat shape as a template to make a double bat shape
from the thin black cardboard. The two shapes need to be connected at the bats
head, so cut carefully. Make a hole on one of the bat's sides the same as the
one on the thick cardboard.
4.
Glue the thin cardboard bat shape to the thick cardboard so
that the holes line up and the bat is folded at the head.
5.
Add stickers for eyes if you want.
Now for the tricky part.
6.
Loop the two rubber bands to either side of the key ring.
7.
Make two slots at the ends of the bat wings.
8.
Stretch the rubber bands across the bat and hook them into the
little slots so that the key ring sits in the hole.
9.
Prepare the trick by turning the key ring over and over to
wind up the rubber bands.
10.
Fold down the bat flap, hold in place so that it does not
move.
11.
Place it carefully into the center of a book.
12.
Now when your friend opens the bokk, the bat will appear to
flap its wings.
Animal Print Journal
Great Salt Lake Council
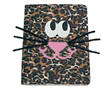
Materials:
Composition notebook
Pink, white, & black craft foam
3 black pipe cleaners
½ yard animal print fabric
Fabric glue or tacky glue or low
temp glue gun
Liquid starch
Disposable bowl
Wax paper
Scissors
Pattern for animal face
Directions:
Go to
http://www.makingfriends.com/schol/journalanimal.htm
For complete directions on how to make these great
Journals.
Woven Bookmarks
Great Salt Lake Council

You will need:
scraps of wrapping paper,
scissors,
craft glue,
self-adhesive vinyl,
a hole punch,
ribbon or tassel.
Directions:
1.
Cut out a book marksize long rectangle from a piece of
wrapping paper. It should be twice the desired width of the finished bookmark.
2.
Fold it in half lengthwise.
3.
Make short cuts from the folded edge to the open side, without
cutting through the open side. The cuts can be various widths and wavy, curved
or angled.
4.
Cut three or four narrow strips out of another wrapping paper
the same length as the long rectangle.
5.
Open the rectangle.
6.
Start weaving a paper strip down the length of the book maker
through the cuts until you reach the other end.
7.
Weave the next strip opposite to the first strip.
8.
When you are finished weaving strips, glue the strip ends down
on the front and back of the bookmark.
9.
Cover both sides with vinyl so the bookmark will last a long
time.
10.
Punch a hole at the top of the bookmark and loop a ribbon or
tassel through it as shown.
Make A Bookmark
Sam Houston
Area Council
Materials:
Scissors
Paper or cardstock,
Instructions:
Cut out a blank bookmark
about 3 x 8. These could be rectangular or be any shape that the Cub Scouts
would like (rockets, bookworm, etc).
Have Scouts decorate with
markers, stickers, etc to use either in their Cub Scout book or in their
favorite book.
Magnetic Bookmarks
Sam Houston
Area Council
When folded
over the edge of a page,
this bookmark holds together and saves the place.
Materials:
·
Card stock or a greeting card cut into a narrow rectangles about
1.5 inches by 6 inches
·
magnet strips or recycled thin advertising magnets
·
All-purpose glue.
Instructions:
ü
Cut greeting card or cardstock into a narrow rectangle about 1.5
inches by 6 inches.
ü
Decorate if desired
ü
Affix pieces of magnet to the short edges, making sure they will
attract and not repel when put together.
ü
Then fold the rectangle in half so the magnetized ends meet.
Make A Horn Book:
Alice, Golden Empire Council
Hornbooks were used to teach lessons to Pilgrim and
Colonial children. The name comes from the thin layer of horn used to protect
the scarce sheet of paper from sticky fingers. You can make your own hornbook.
Go to
www.rootsweb.ancestry.com/~mosmd/hornbk.jpg
Build a Bookworm
Alice, Golden Empire Council
Using circles cut from colored paper, build a bookworm by
making a face and then adding segments to the body each time a new book is
read. Each boy could build his own bookworm, or the den or pack could add to a
bookworm during the month. Also, individual families could build their own
bookworm during the month as they read books. The bookworm can be mounted on
the wall, with the name of the book written on each segment. Different colored
segments could be used for each boy, each den, each family, or even just
different kinds of books.
Make Some Raingutter Book Shelves:
Alice, Golden Empire Council
Librarians, booksellers and publishers all know that having
the cover of a book face out makes it more attractive. This is especially true
for children. Go to:
www.Trelease-on-reading.com
And Scroll down
to Raingutters for bookshelves
to learn how to make these easy, affordable bookshelves ($3
for 10 feet) This could be a great project for families, or as a den or pack
service project for a school library, community center or shelter!
While you
are there, take some time to explore the sight. Learn about how important your
reading to your children is to their future success. I was amazed!! CD
Explore the special awards for Childrens Books:
Alice, Golden Empire Council
See if someone in your pack
has some old childrens books without pictures or with only a few black and
white pictures. Compare with the hundreds of colorful books published each
month for children today.
Newbery Medal
If not for John Newbery, we might still be looking at some pretty boring
books. He was an English bookseller who lived about two hundred years ago he
was described as good-natured and always in a hurry. He wanted to make the
books more interesting for girls and boys, so he had some of the pictures
colored by hand and then bound them in colorful flowered covers. He is
sometimes called The Father of Childrens Literature.
Frederic Melcher of Montclair,
New Jersey also wanted to encourage the writing of better books for children.
He founded the Childrens Book Week" held each year. He also founded the John
Newbery Medal -starting in 1922, a committee of childrens librarians select one
new childrens book as the best childrens book written in that year to be
awarded the medal.
http://www.ala.org/ala/alsc/awardsscholarships/literaryawds/newberymedal/newberymedal.cfm
Caldecott Medal
The award of a second medal for childrens books, called the Caldecott
Medal, was begun in 1938. It is awarded to the artist who is selected as having
done the best job of illustration for a childrens book each year.
Every library will have a list
of the winners check with the Childrens Librarian and let the boys compare
several of the winners to see who their first choice would be in each category!
http://www.ala.org/ala/alsc/awardsscholarships/literaryawds/caldecottmedal/caldecottmedal.cfm
Both awards are sponsored by
the American Library Association. You can check out the awards presented by the
ALA at
http://www.ala.org/ala/alsc/alsc.cfm
Also, check out their list of great websites for kids
Knight's Shield
Heart of America Council
·
Take a large cardboard box and cut a
shield shape out of the side.
·
Cut a strip (about 8 inches by 2
inches) of heavy fabric or leather and glue or fasten it to the back. You
can also use cardboard but it won't last as long. This is the handle.
·
Either spray paint the front of the
shield silver or cover it with tin foil (you can glue down the tin foil).
·
Paint designs on the front or cut out
the knight's symbol and tape it to the front of the shield.
Scepter
Heart of America Council
·
Take a cardboard tube from a roll of
paper towels.
·
Glue a Styrofoam ball on top (hobby
shops or fabric stores with carry this).
·
Cover the scepter with gold fabric or
spray paint. If you spray paint it, you might want to dust it with sparkles
while the paint is still wet.
·
You can then twirl bright color ribbon
around the scepter gluing the top and bottom strands.
·
Some fake "jewels" that glitter adds a
nice touch.
Family and Den Activities with Books
Alice, Golden Empire Council
Record a
story: Each boy or family could record a favorite story if its a
favorite of younger brothers or sisters, you could even add a sound at the end
of each page, so they can read along. Match the mood of the story or change
the voice of each character to make your recording really special. (If each
family records a story, you might be able to make a CD of all the pack favorite
stories)
Read some
folk tales from around the world: Each culture has its own folk tales, but
you will be surprised to see that many of them, although from different places
in the world, are almost alike. Check with a librarian for some help they may
even have a list of folk tales of the world.
Have a
book exchange: Each person brings a book or books. Everyone gets to
exchange their book for a new selection.
Have a
book sale: Families bring books in good condition books can be sorted by
type, then sold to raise money for a pack or den service project. Proceeds can
be donated to a library or used to purchase a new library book(s). Be sure to
check with the librarian she can order books with special bindings.
Donate a
book in your name or in your familys name: Check with your librarian and
tell her you want to donate a book she may have a wish list, and will also
want to order special bindings. The book could be a favorite story or from the
wish list.
Visit the
local library. Arrange the visit in advance so the librarian can explain
how the library is laid out, and tell about special services and events.
Make
and/or display a collection of the different kinds of books used throughout
history: Use clay and a pointed stylus made from a thin dowel; make a
hornbook as described earlier; also show off the folded books shown in this
packet. Some boys may also have personal books that were made in their school
class. See how many different kinds of books you can make. Also, you could ask
parents and families to bring any interesting books they could contribute to the
display, such as Dick & Jane books or e-books, Braille books or books in another
language.
Learn
about special religious books: Many families have a tradition to read from
religious texts every night. Ask a friend from a different religion to share
some text from their religious book Christians read from the Bible, but some
have additional books in their Bible. People from the Church of Jesus Christ of
Latter Day Saints (Mormon), also read from the Book of Mormon, Doctrine &
Covenants and Pearl of Great Price. Jewish families have two holy books the
Torah, which is part of the Hebrew Bible, and the Talmud, which gives directions
for Jewish life. Muslim children start reading the Quran when very young
during October, they celebrate Lailat al-Qadr, or Night of Power, commemorating
the first revelations Muhammad is said to have received from Allah. The Quran
is considered one of the most beautifully written religious texts.
Out of Sight
Southern NJ Council
·
Have Scouts sit up to a table.
·
Give each a piece of construction paper.
·
Blindfold everyone and give them each a crayon.
·
Ask them to draw a picture of a specific character from a book
(Charlie Brown, Harry Potter, etc.).
·
When all are finished, collect the papers before removing the
blindfolds.
·
Hang the picture up and ask the boys to guess which is their own
picture. (You may want to write initials on the back side when you collect
them.
Its harder
than you think.!! Steve L.
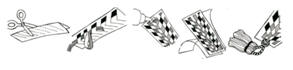
Road Map Slide
Southern NJ Council
Materials
2 square piece of ½ scrap wood,
old road map,
piece of plastic pipe,
glue,
small plastic car.
Directions:
ü
Sand wood smooth.
ü
Cut a piece of the map the same size as your wood, (of somewhere
in your favorite book),
ü
then glue it on.
ü
Hot glue the small plastic car on top the map,
ü
Hot glue the pipe to the back of the wood to form the slide loop.
Character Tie Slide
Southern NJ Council
Materials:
3 parts
white glue to 1 part warm water
jar or
bottle with screw top lid
balsa
wood or cardboard
1/2"
length of 5/8" PVC pipe
postage
stamp or picture from a magazine of a character from a book.
paint
brush
glue
Directions:
1.
Combine glue with water in jar or bottle.
2.
Shake until well mixed. This glue may be stored indefinitely.
3.
Cut a piece of balsa wood or cardboard large enough to hold
the selected picture.
4.
Brush a thin layer of glue to the back surface of the
picture.
5.
Lay the design onto the cardboard or wood and smooth out all
air bubbles and wrinkles.
6.
Let dry.
7.
Glue the ring of PVC pipe to the back to form the slide.
Tom Sawyer Light Plate Cover
Southern NJ Council
Materials:
Plain light plate for switch
Craft sticks
Directions:
ü
Cut one craft stick.
ü
Glue six more to switch plate.
ü
Cut Tom Sawyer and paint brush out of felt and glue to cover.
ü
Add features and names with "Sharpie" pen.
Magnetic Note Holders
Southern NJ Council
«
Cut a small shape from construction paper or fun foam, just large
enough to cover one side of the clothespin.
«
Use markers, glue, glitter, fabric, lace -- any odds and ends you
have -- to decorate the shape.
«
Hot glue the decorated shape to the front of the clothespin.
«
Hot glue a (strong) magnet to the backside of the clothespin.
«
Put it on your fridge -- it can be used to clip notes, artwork, or
recipes to the fridge.
«
Ideas for shapes:
ü
Apples or other fruit
ü
Sunshine
ü
Stars
ü
Hearts
ü
Any cookie-cutter shape that is large enough
ü
Storybook or historical characters
MORE GAMES AND ACTIVITIES
Sam Houston Area Council

From the Cub Scout Leader How-To Book
ü
-Printing, page 2-14 to 2-16
ü
-Autumn Harvest Festival, page 6-10
Materials found in Baloo's Bugle may be used by Scouters for Scouting activities provided that Baloo's Bugle and the original contributors are cited as the source of the material. |
|


